MaeFat
(→Data File Format / Entering Many Data Points) |
(→Editing the Log) |
||
| (15 intermediate revisions not shown) | |||
| Line 5: | Line 5: | ||
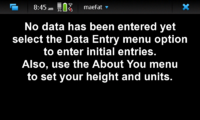
[[Image:maeFatInitialScreen.png|thumb|200px|alt=Screenshot of maeFat Initial Screen|Initial Screen]] | [[Image:maeFatInitialScreen.png|thumb|200px|alt=Screenshot of maeFat Initial Screen|Initial Screen]] | ||
| - | When you initially run the program, there will be no data available, and you will see the display shown on the right. You must either enter data through the app, or copy a data file of your own into the proper location. Also, you must use the | + | When you initially run the program, there will be no data available, and you will see the display shown on the right. You must either enter data through the app, or copy a data file of your own into the proper location. Also, you must use the About You menu option in order to enter your height (which is used to calculate your [[:wikipedia:Body_mass_index|Body Mass Index]] (BMI). |
{{clear}} | {{clear}} | ||
| Line 12: | Line 12: | ||
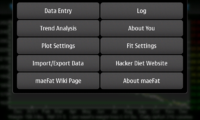
[[Image:maeFatMenu.png|thumb|200px|alt=Screenshot of maeFat Menu|Menu]] | [[Image:maeFatMenu.png|thumb|200px|alt=Screenshot of maeFat Menu|Menu]] | ||
| - | The image to the right shows the maeFat menu. To enter data, select the Data Entry option. The Log option allows you to edit entries which have already been entered. The | + | The image to the right shows the maeFat menu. To enter data, select the Data Entry option. The Log option allows you to edit entries which have already been entered. The Trend Analysis option displays statistics about the data which has been entered. The About You option allows you to enter personal information, such as your height, your target weight, etc. The Plot Settings option allows you to control the main data plot, which shows your weight and BMI as a function of time. The Fit Settings page allows you to define a time interval overwhich the program will do a linear least sqares fit to your weight data, in order to estimate the time at which you will meet your weight goal. The Import/Export Data option allows you to write out or read in multiple weight-time data points. The Help option displays this page in the unit's web browser, and the About options shows a page containing copyright and other information about the program. The Hacker Diet help button opens the Hacker Diet website in the browser (maeFat is very similar to the Hacker Diet "Eat Watch"). |
{{clear}} | {{clear}} | ||
| Line 23: | Line 23: | ||
If you press the arrow at the upper right corner (the normal way to exit a page) the new data will NOT be entered into the log. | If you press the arrow at the upper right corner (the normal way to exit a page) the new data will NOT be entered into the log. | ||
| - | It is recommended that you not enter more than one weight entry per day, although the software allows you to do so if you wish to | + | It is recommended that you not enter more than one weight entry per day, although the software allows you to do so if you wish to. |
{{clear}} | {{clear}} | ||
== Settings == | == Settings == | ||
| - | + | There are three pages which allow you to change how the program operates: | |
| - | The | + | === About You === |
| + | |||
| + | [[Image:maeFatAboutYou.png|thumb|200px|alt=maeFat About You|About You]] | ||
| + | |||
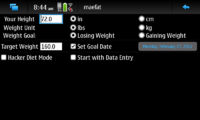
| + | The About You page must be used at least once, to enter your height. | ||
| + | When you enter your height, you should select centimeter units if that's what you wish to use (rather than inches). You may also select metric units for weight. | ||
| + | You may also set a target weight, which can be displayed as a green line on the weight vs time plot, and which will be used to calculate when you will reach your goal. You may set a target date, which will cause the Trend Analysis page to show how many more (or fewer) calories you must consume per day in order to meet your goal weight by the goal date. | ||
| + | |||
| + | You may specify whether your goal is to gain or lose weight. That selection controls the colors shown in some plots and text boxes. For example if your goal is to lose weight, and you are in fact losing weight, the rate of | ||
| + | weight change shown on the Trend Analysis page will be shown in green. Otherwise it will be shown in red. | ||
| + | |||
| + | The Hacker Diet button controls the formula used to calculate the trend weight (see explanation below). The Start With Data Entry button controls what is shown when the program begins running. By default the weight vs time plot is shown, but if you check the Start With Data Entry the program will initialize on the page which allows you to enter a weight value, which can save a few menu navigation steps. | ||
| + | |||
| + | === Plot Settings === | ||
| + | |||
| + | [[Image:maeFatPlotSettings.png|thumb|200px|alt=maeFat Plot Settings|Plot Settings]] | ||
| + | |||
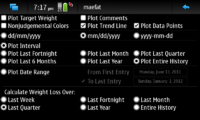
| + | The Plot Settings page controls the main weight vs time plot. The Plot Target Weight checkbox controls whether or not your goal weight in shown on the plot. The Plot Comments checkbox controls whether any comments you have entered along with your weight values get shown on the plot. | ||
| + | |||
| + | By default, things which are usually considered bad, such as having a BMI in the obese range, are shown in red. Good things, like losing weight when your goal is to lose weight, are shown in green. The BMI color code is: | ||
* '''Red''': Obese or Severely Underweight | * '''Red''': Obese or Severely Underweight | ||
| Line 36: | Line 55: | ||
* '''Green''': Normal weight range | * '''Green''': Normal weight range | ||
| - | You | + | You can suppress all this color coding with the Nonjudgemental Colors checkbox. |
| - | + | The Plot Trend Line checkbox controls whether or not the exponentially weighted average weight value is shown on the plot. The Plot Data Points checkbox controls whether or not your individual weight entries are plotted. | |
| - | + | ||
| - | + | ||
| - | + | ||
| - | + | ||
| - | There is | + | There is a set of three buttons which controls the format used to print dates throughout the program. |
| - | + | ||
| + | The next set of buttons control the time range for the plot. If you select Plot Interval, you will be presented with a range of standard time intervals for the plot. If, for example, you choose Plot Last Month, then all the data enterred in the last 30 days will be plotted. If you select Plot Date Range, you can set a custom time interval by specifying the starting and ending dates for the plot. You can also specify just one date, and have the program plot all the data before or after that date. | ||
| + | |||
| + | The final set of buttons at the bottom of the page allows you to specify the time range used for the weight loss summary printed at the bottom of the plot. By default the app calculates how much weight you've lost of gained during the last week, and uses that number for calculating the daily caloric deficit or excess. These buttons allow you to change that interval. | ||
| + | |||
| + | === Fit Settings === | ||
| + | |||
| + | [[Image:maeFatFitSettings.png|thumb|200px|alt=maeFat Fit Settings|Fit Settings]] | ||
| + | |||
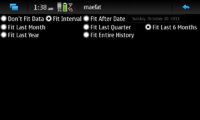
| + | The Fit Settings page allows you to specify a time range overwhich the program will perform a linear least squares fit to your data points. This least squares fit will be used to estimate the time at which you will reach your goal weight. This is shown on the Trend Analysis page. Also, if you tell the program to plot your goal weight, the linear fit will also be shown on the plot, along with the slope which tells you how many pounds (or kg) per week you are losing or gaining. | ||
| + | |||
| + | {{clear}} | ||
| + | |||
| + | == Import/Export Data == | ||
| + | |||
| + | [[Image:maeFatImportExport.png|thumb|200px|alt=maeFat Import/Export|Import/Export]] | ||
| + | |||
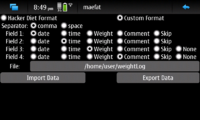
| + | The Import/Export page allows you to write out your weight log (Export) or read a new one in (Import). You may select the format used by the Hacker Diet Online website, or a custom comma (or whitespace) separated list. If you choose a custom format, you may specify which fields of the weight log are written/read, and in which order. You must specify at least date and weight fields if you're reading in a custom format file. | ||
| + | |||
| + | Note that the Hacker Diet format does not contain a field for time of day, so the measurements will be treated as having been made at the time 00:00. | ||
{{clear}} | {{clear}} | ||
| Line 63: | Line 96: | ||
The Trend Page shows statistical information about your weight data over differing time intervals. Initially, when little data is available, it will show only the values for the entire log history. Eventually data for the last week, fortnight (2 weeks), month (30 days), quarter (91 days) and year will be shown, when enough data is available to calculate those values. | The Trend Page shows statistical information about your weight data over differing time intervals. Initially, when little data is available, it will show only the values for the entire log history. Eventually data for the last week, fortnight (2 weeks), month (30 days), quarter (91 days) and year will be shown, when enough data is available to calculate those values. | ||
| + | |||
| + | If you have entered a goal weight and a goal date, the program will display how many more or fewer calories you must consume per day, in order to meet both of those goals. | ||
| + | |||
{{clear}} | {{clear}} | ||
| Line 74: | Line 110: | ||
The weight values shown on the Trend Page are calculated with these formulae, and the caloric excess/deficit values are calculated using the difference in trend value over the specified interval, with the assumption that one pound of weight change corresponds to 3500 calories. | The weight values shown on the Trend Page are calculated with these formulae, and the caloric excess/deficit values are calculated using the difference in trend value over the specified interval, with the assumption that one pound of weight change corresponds to 3500 calories. | ||
{{clear}} | {{clear}} | ||
| - | |||
== Estimating When You Will Reach Your Target Weight == | == Estimating When You Will Reach Your Target Weight == | ||
| Line 82: | Line 117: | ||
If you have entered a target weight, and defined a fit interval (both may be set on the Settings Page), maeFat will estimate when you will reach your target weight, based on a linear least squares fit to your weight entries, over the time interval you have specified. The estimated date (and exact time of day!) that you will reach your target weight will be displayed on the Trend Page. | If you have entered a target weight, and defined a fit interval (both may be set on the Settings Page), maeFat will estimate when you will reach your target weight, based on a linear least squares fit to your weight entries, over the time interval you have specified. The estimated date (and exact time of day!) that you will reach your target weight will be displayed on the Trend Page. | ||
In addition, if you select the Plot Target Weight option, the weight vs time plot will show the least squares fit to your data, and the point at which that line | In addition, if you select the Plot Target Weight option, the weight vs time plot will show the least squares fit to your data, and the point at which that line | ||
| - | will intersect your target weight (see plot to the right). | + | will intersect your target weight (see plot to the right, for which all data after June 13, 2011 was used for the fit). A grey vertical line is drawn at |
| + | the beginning of the fit interval. All points to the right of that line were | ||
| + | used in the fit. | ||
{{clear}} | {{clear}} | ||
| Line 94: | Line 131: | ||
Once you have selected the month and have pushed the View Selected Month button, you will be presented with a page listing all the data entries for that month. The green weight values are the measurements that you have entered. The yellow weight values are trend weights, calculated with one of the formulae shown above. If you press on one of these entries, you will be sent to the Data Entry page, which will be preloaded with the selected day's values, where you may change the values. You may also press the Delete button to remove the entry entirely. | Once you have selected the month and have pushed the View Selected Month button, you will be presented with a page listing all the data entries for that month. The green weight values are the measurements that you have entered. The yellow weight values are trend weights, calculated with one of the formulae shown above. If you press on one of these entries, you will be sent to the Data Entry page, which will be preloaded with the selected day's values, where you may change the values. You may also press the Delete button to remove the entry entirely. | ||
| + | |||
| + | If the month you chose to display contains more than 33 weight entries, the log display will be split across multiple pages. Blue arrows will appear at the top of the page to allow you to navigate from page to page. | ||
{{clear}} | {{clear}} | ||
| Line 112: | Line 151: | ||
== Availability == | == Availability == | ||
| - | maeFat is available in the Extras Devel repository. | + | maeFat is available in the Extras Devel repository. The source code is hosted on github. |
== Support Information == | == Support Information == | ||
Latest revision as of 00:39, 13 February 2012
maeFat is a Maemo 5 app for the N900 which helps you to track your weight history. It is similar to the Hacker's Diet tools, but not identical to them. It allows you to log your weight, plot that data along with an exponentially weighted running average, and determine caloric excess/deficit over a variety of time intervals. maeFat is open source and cost-free.
[edit] The Initial Display
When you initially run the program, there will be no data available, and you will see the display shown on the right. You must either enter data through the app, or copy a data file of your own into the proper location. Also, you must use the About You menu option in order to enter your height (which is used to calculate your Body Mass Index (BMI).
[edit] Menu
The image to the right shows the maeFat menu. To enter data, select the Data Entry option. The Log option allows you to edit entries which have already been entered. The Trend Analysis option displays statistics about the data which has been entered. The About You option allows you to enter personal information, such as your height, your target weight, etc. The Plot Settings option allows you to control the main data plot, which shows your weight and BMI as a function of time. The Fit Settings page allows you to define a time interval overwhich the program will do a linear least sqares fit to your weight data, in order to estimate the time at which you will meet your weight goal. The Import/Export Data option allows you to write out or read in multiple weight-time data points. The Help option displays this page in the unit's web browser, and the About options shows a page containing copyright and other information about the program. The Hacker Diet help button opens the Hacker Diet website in the browser (maeFat is very similar to the Hacker Diet "Eat Watch").
[edit] Data Entry
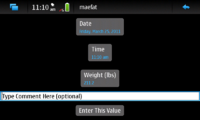
The Data Entry page allows you to enter new weight data. It does that without requiring you to use the N900's keyboard. It contains hildon Date and Time widgets preloaded with the current time and date. You can use these to change the time tag for the weight data you are entering, if you don't want to use the current time. The Weight widget is used to enter the weight. If no data has yet been entered, it will be preloaded with 150 pounds (unless you chosen metric units), otherwise it will be preloaded with the most recent weight entry. The comments widget allows you to tag the entry with an optional text comment. You must press the Enter This Value button, to put the data into your weight log. If you press the arrow at the upper right corner (the normal way to exit a page) the new data will NOT be entered into the log.
It is recommended that you not enter more than one weight entry per day, although the software allows you to do so if you wish to.
[edit] Settings
There are three pages which allow you to change how the program operates:
[edit] About You
The About You page must be used at least once, to enter your height. When you enter your height, you should select centimeter units if that's what you wish to use (rather than inches). You may also select metric units for weight. You may also set a target weight, which can be displayed as a green line on the weight vs time plot, and which will be used to calculate when you will reach your goal. You may set a target date, which will cause the Trend Analysis page to show how many more (or fewer) calories you must consume per day in order to meet your goal weight by the goal date.
You may specify whether your goal is to gain or lose weight. That selection controls the colors shown in some plots and text boxes. For example if your goal is to lose weight, and you are in fact losing weight, the rate of weight change shown on the Trend Analysis page will be shown in green. Otherwise it will be shown in red.
The Hacker Diet button controls the formula used to calculate the trend weight (see explanation below). The Start With Data Entry button controls what is shown when the program begins running. By default the weight vs time plot is shown, but if you check the Start With Data Entry the program will initialize on the page which allows you to enter a weight value, which can save a few menu navigation steps.
[edit] Plot Settings
The Plot Settings page controls the main weight vs time plot. The Plot Target Weight checkbox controls whether or not your goal weight in shown on the plot. The Plot Comments checkbox controls whether any comments you have entered along with your weight values get shown on the plot.
By default, things which are usually considered bad, such as having a BMI in the obese range, are shown in red. Good things, like losing weight when your goal is to lose weight, are shown in green. The BMI color code is:
- Red: Obese or Severely Underweight
- Yellow: Overweight or Underweight
- Green: Normal weight range
You can suppress all this color coding with the Nonjudgemental Colors checkbox.
The Plot Trend Line checkbox controls whether or not the exponentially weighted average weight value is shown on the plot. The Plot Data Points checkbox controls whether or not your individual weight entries are plotted.
There is a set of three buttons which controls the format used to print dates throughout the program.
The next set of buttons control the time range for the plot. If you select Plot Interval, you will be presented with a range of standard time intervals for the plot. If, for example, you choose Plot Last Month, then all the data enterred in the last 30 days will be plotted. If you select Plot Date Range, you can set a custom time interval by specifying the starting and ending dates for the plot. You can also specify just one date, and have the program plot all the data before or after that date.
The final set of buttons at the bottom of the page allows you to specify the time range used for the weight loss summary printed at the bottom of the plot. By default the app calculates how much weight you've lost of gained during the last week, and uses that number for calculating the daily caloric deficit or excess. These buttons allow you to change that interval.
[edit] Fit Settings
The Fit Settings page allows you to specify a time range overwhich the program will perform a linear least squares fit to your data points. This least squares fit will be used to estimate the time at which you will reach your goal weight. This is shown on the Trend Analysis page. Also, if you tell the program to plot your goal weight, the linear fit will also be shown on the plot, along with the slope which tells you how many pounds (or kg) per week you are losing or gaining.
[edit] Import/Export Data
The Import/Export page allows you to write out your weight log (Export) or read a new one in (Import). You may select the format used by the Hacker Diet Online website, or a custom comma (or whitespace) separated list. If you choose a custom format, you may specify which fields of the weight log are written/read, and in which order. You must specify at least date and weight fields if you're reading in a custom format file.
Note that the Hacker Diet format does not contain a field for time of day, so the measurements will be treated as having been made at the time 00:00.
[edit] Plot Page
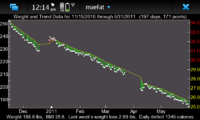
The program's default page shows a plot of the data you have entered, and a trend line. The yellow trend line is the exponentially weighted running average of the weight data. The scale on the left of the plot is in the weight units you have chosen. On the right is shown the corresponding BMI values. The line at the bottom presents your current weight (from the trend line, not any particular data entry), the weight lost or gained over the last week (regardless of the plot interval) and the number of excess/deficit calories per day which will produce that weight change.
The nice thing about plotting the trend line is that it smooths out the fluctuations which inevitably will appear in your weight log, due to how recently you've eaten, the time of day when you weighed yourself, etc. If you are losing or gaining weight, the trend line will drop or rise nearly monotonically, even if your daily measurements are quite noisy.
[edit] Trend Page
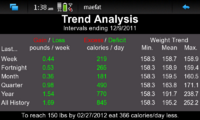
The Trend Page shows statistical information about your weight data over differing time intervals. Initially, when little data is available, it will show only the values for the entire log history. Eventually data for the last week, fortnight (2 weeks), month (30 days), quarter (91 days) and year will be shown, when enough data is available to calculate those values.
If you have entered a goal weight and a goal date, the program will display how many more or fewer calories you must consume per day, in order to meet both of those goals.
[edit] Methods of Weight Trend Calculation
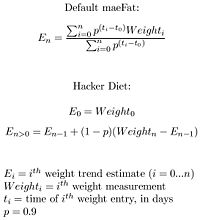
The trend line (shown in yellow on the Plot Page) and the trend values shown on the Trend Page are calculated using one of the two formulae shown on the right. The Settings page allows you to chose which formula to use. If you enter a weight value every day, the two formulae will give nearly identical results. The difference between them appears if you have gaps in your weight log. The Hacker Diet formula does not take elapsed time into account when calculating the trend. So if you enter a weight after having not weighed yourself for a month, the Hacker Diet formula will give as much (mathematical) weight to the penultimate and earlier weight values as they would have had if you had no gap in your weight log. The default formula used by maeFat takes the time interval into account, and will decrease the (mathematical) weight given to entries which were made long ago. The Hacker Diet formula is less computationally expensive, so if you have a weight log with many thousands of entries, it will be faster to use the Hacker Diet formula, which will also save a tiny amount of battery power.
The weight values shown on the Trend Page are calculated with these formulae, and the caloric excess/deficit values are calculated using the difference in trend value over the specified interval, with the assumption that one pound of weight change corresponds to 3500 calories.
[edit] Estimating When You Will Reach Your Target Weight
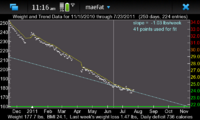
If you have entered a target weight, and defined a fit interval (both may be set on the Settings Page), maeFat will estimate when you will reach your target weight, based on a linear least squares fit to your weight entries, over the time interval you have specified. The estimated date (and exact time of day!) that you will reach your target weight will be displayed on the Trend Page.
In addition, if you select the Plot Target Weight option, the weight vs time plot will show the least squares fit to your data, and the point at which that line
will intersect your target weight (see plot to the right, for which all data after June 13, 2011 was used for the fit). A grey vertical line is drawn at
the beginning of the fit interval. All points to the right of that line were
used in the fit.
[edit] Editing the Log
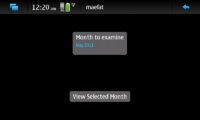
If you select the Edit option, you will first be presented with a page containing a widget which allows you to select which month's data you wish to edit. This widget will be loaded with every month for which data is available.
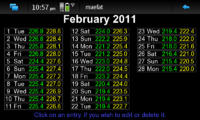
Once you have selected the month and have pushed the View Selected Month button, you will be presented with a page listing all the data entries for that month. The green weight values are the measurements that you have entered. The yellow weight values are trend weights, calculated with one of the formulae shown above. If you press on one of these entries, you will be sent to the Data Entry page, which will be preloaded with the selected day's values, where you may change the values. You may also press the Delete button to remove the entry entirely.
If the month you chose to display contains more than 33 weight entries, the log display will be split across multiple pages. Blue arrows will appear at the top of the page to allow you to navigate from page to page.
[edit] Data File Format / Entering Many Data Points
If you have a pre-existing weight log that you wish to enter, it will be very tedious to enter each point individually using the GUI interface. It makes much more sense to convert your weight log into the format maeFat uses using some external script. The data is kept in the file $HOME/.maeFat/data. A backup copy is kept on the microSD card (so that if you have to reflash the N900, your log won't be lost) in the file /media/mmc1/.maeFat/data . The data file is a flat text file, with one line per log entry, using the following format:
DD/MM/YYYY HH:MM XXX.X # Optional comment here
where DD is the day of the month, MM is the number of the month, YYYY is the year, HH is the hour, MM is the minutes, and XXX.X is the weight. The weight should be in kgs or pounds depending on whether maeFat has been configured to display metric units or not. Any comment must be preceded by a #, but no # is needed for entries without a comment.
There is no need for you to load your data into the backup file, because it will be rewritten automatically once any data is entered or edited with the program's GUI.
[edit] Entering Weights Outside the Default Range
When the program is first run, it has no way of knowing what the proper range is for the weight selector widget on the Data Entry page. The weight selector is initially loaded with weight values from 50 to 250 pounds (or 23 to 113 kg, if metric units have been selected). If you wish to enter an initial weight which falls outside of that range, you can just use a text editor to edit the /media/mmc1/.maeFat/data file, with the format described above, to enter your initial weight. After the first value has been entered, the weight selector will display a range of weights near that value when the Data Entry page is displayed, so only the first value will need to be entered with the text editor.
[edit] Availability
maeFat is available in the Extras Devel repository. The source code is hosted on github.
[edit] Support Information
If you have questions, comments or requests concerning this program, please send them to orrery.moko@gmail.com. maeFat uses the official Maemo bugzilla for bug tracking.
- This page was last modified on 13 February 2012, at 00:39.
- This page has been accessed 58,804 times.

