Personal Menu tips and tricks
andrewfblack (Talk | contribs) |
andrewfblack (Talk | contribs) |
||
| Line 1: | Line 1: | ||
This page is a collection of tips and tricks for Personal Menu and Personal Launcher. | This page is a collection of tips and tricks for Personal Menu and Personal Launcher. | ||
| - | = Opening File in Media Player = | + | == Opening File in Media Player == |
*Step 1: <b><u>Open</u></b> Settings for Pmenu or PLauncher | *Step 1: <b><u>Open</u></b> Settings for Pmenu or PLauncher | ||
| Line 17: | Line 17: | ||
| - | = Adding entry for Web address = | + | == Adding entry for Web address == |
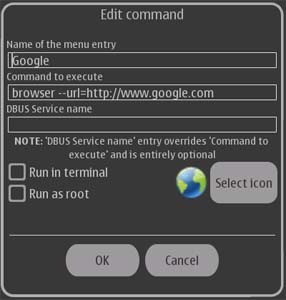
[[Image:Plaunchss.jpg|frame|Example of Adding Icon for Google]] | [[Image:Plaunchss.jpg|frame|Example of Adding Icon for Google]] | ||
| Line 35: | Line 35: | ||
<pre><nowiki>*</nowiki><location to file> would be either the web address or the location of the file on your tablet</pre> | <pre><nowiki>*</nowiki><location to file> would be either the web address or the location of the file on your tablet</pre> | ||
| - | |||
| - | |||
| - | + | == Adjust Volume using Personal Launcher == | |
| - | + | ||
| - | = Adjust Volume using Personal Launcher = | + | |
*Step 1: <b><u>Open</u></b> Settings for Personal Launcher | *Step 1: <b><u>Open</u></b> Settings for Personal Launcher | ||
Revision as of 16:42, 27 January 2009
This page is a collection of tips and tricks for Personal Menu and Personal Launcher.
Opening File in Media Player
- Step 1: Open Settings for Pmenu or PLauncher
- Step 2: Click add new entry
- Step 3: Name your entry
- Step 4: Enter into Command to execute: /usr/bin/dbus-send --print-reply --dest=com.nokia.mediaplayer /com/nokia/mediaplayer com.nokia.mediaplayer.mime_open string:"<location of file>"
- Step 5: Choose Icon
- Step 6: Click Ok and Close Settings window.
*<location to file> would be either the web address or the location of the file on your tablet
Adding entry for Web address
To add a entry for either a web address or any file that is location on your tablet that opens in browser use the following tip.
- Step 1: Open Settings for Pmenu or PLauncher
- Step 2: Click add new entry
- Step 3: Name your entry
- Step 4: Enter into Command to execute: browser --url=<location to file>
- Step 5: Choose Icon
- Step 6: Click Ok and Close Settings window.
*<location to file> would be either the web address or the location of the file on your tablet
Adjust Volume using Personal Launcher
- Step 1: Open Settings for Personal Launcher
- Step 2: Adding Volume Down
- Step 2.1: Click add new entry
- Step 2.2: Name your entry
- Step 2.3: Enter into Command to execute: gconftool -t int -s /apps/osso/sound/master_volume `expr $(gconf-tool -g /apps/osso/sound/master_volume) - 10`
- Step 3: Adding Volume Down
- Step 3.1: Click add new entry
- Step 3.2: Name your entry
- Step 3.3: Enter into Command to execute: gconftool -t int -s /apps/osso/sound/master_volume `expr $(gconf-tool -g /apps/osso/sound/master_volume) + 10`
Taken from itT Thread[1]

