Personal Menu tips and tricks
This page is a collection of tips and tricks for Personal Menu and Personal Launcher.
Contents |
Opening File in Media Player
- Step 1: Open Settings for Pmenu or PLauncher
- Step 2: Click add new entry
- Step 3: Name your entry
- Step 4: Enter into Command to execute: /usr/bin/dbus-send --print-reply --dest=com.nokia.mediaplayer /com/nokia/mediaplayer com.nokia.mediaplayer.mime_open string:"<location of file>"
- Step 5: Choose Icon
- Step 6: Click Ok and Close Settings window.
*<location to file> would be either the web address or the location of the file on your tablet
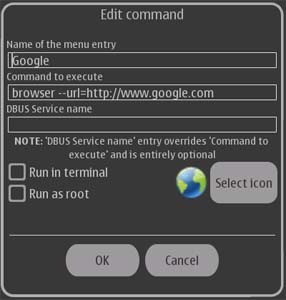
Adding entry for Web address
To add a entry for either a web address or any file that is location on your tablet that opens in browser use the following tip.
- Step 1: Open Settings for Pmenu or PLauncher
- Step 2: Click add new entry
- Step 3: Name your entry
- Step 4: Enter into Command to execute: browser --url=<location to file>
- Step 5: Choose Icon
- Step 6: Click Ok and Close Settings window.
*<location to file> would be either the web address or the location of the file on your tablet
Adjust Volume using Personal Launcher
- Step 1: Open Settings for Personal Launcher
- Step 2: Adding Volume Down
- Step 2.1: Click add new entry
- Step 2.2: Name your entry
- Step 2.3: Enter into Command to execute: gconftool -t int -s /apps/osso/sound/master_volume `expr $(gconf-tool -g /apps/osso/sound/master_volume) - 10`
- Step 3: Adding Volume Down
- Step 3.1: Click add new entry
- Step 3.2: Name your entry
- Step 3.3: Enter into Command to execute: gconftool -t int -s /apps/osso/sound/master_volume `expr $(gconf-tool -g /apps/osso/sound/master_volume) + 10`
Taken from itT Thread[1]
Adding Custom Icons for Personal Menu/Launcher
If you would like to add some icons that you can use for your personal menu/launcher or if you would like to change on that is already there follow these steps.
- Step 1: Create a 64px x 64px icon and save in .png format.
- Step 2: Upload file to /usr/share/icons/hicolor/scalable/hildon/
- Step 3: Run in Terminal as root: gtk-update-icon-cache -f /usr/share/icons/hicolor
- Step 3.1 Rebooting device should do the trick also.
- Step 4: Set icon for your entry.
Custom icon will appear under hildon in drop down box.

