Privoxy
Privoxy is a web proxy. This means that it is a program which runs on your tablet through which all http/https traffic is routed. It can be utilized to filter advertisements, popups, and other annoying web content. It can also be used to access remote proxies that require specific user-agent information or other custom http headers. For more information, see the Privoxy FAQ and the Privoxy User Manual.
Privoxy is available from the maemo "extras" repository. It is available for gregale (770), bora (OS 2007), chinook (N800), and diablo (N800/N810). Once installed, privoxy runs as a daemon (in the background). However, the network connection(s) must be configured to actually use privoxy.
Contents |
[edit] Installation
You must have the Extras repository enabled. Then click on the "Browse Installable Applications" button and then the "All" button to find "Privoxy" in the list. Install it as you would any other application. Upon successful installation, privoxy will be running in the background.
Next you must configure your network connection to utilize privoxy as a "proxy". On a typical desktop system, each application has its own proxy settings. On the NIT, each connection has its own proxy settings. This is unfortunate for two reasons. First, every time you connect to a new wireless access point (at your local coffee shop for example) and you want to use privoxy, you must enter the proxy configuration for that connection. Second, certain built-in applications (namely the Media Player) have issues with privoxy.
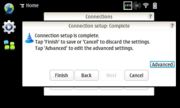
These instructions assume that you already have an entry for your network connection and you simply want to add privoxy to it. (You could just as easily adapt these instructions to a new connection.) Open the "Connectivity" Control Panel and click the "Connections" button to view your list of configured connections. Select the desired connection and click the "Edit" button. Note that you cannot edit a connected entry, which means if you want to add privoxy to your current connection, you must first disconnect. Once you are in the "Connection setup" dialog, click "Next" several times until you get to the "Complete" dialog.
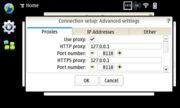
Now click the "Advanced" button. In the "Advanced settings" dialog, make sure you are on the "Proxies" tab. Check the "Use proxy" checkbox and enter proxy address 127.0.0.1 and port 8118 for both http and https as shown in the next image.
Click the "OK" button, and then the "Finish" button to save the settings. Click "Done"/"OK" buttons to get out of the Connectivity Control Panel. Now connect to the newly configured connection.
To verify that privoxy is running, open the web browser and enter the following address:
http://p.p
(Note that you can simply enter "p.p" and http:// will be prepended automatically.) You should see the main privoxy screen. Congratulations, your web traffic is now being filtered.
[edit] Configuration
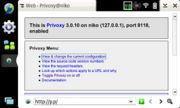
Configuration of privoxy is accomplished through the web interface. To configure privoxy, open a web browser and enter p.p into the address textbox. http://p.p is a shortcut for the "real" configuration page http://config.privoxy.org/. You should see the main privoxy page showing the main Privoxy Menu.
Click the first link in the Privoxy Menu labeled "View & change the current configuration". This will take you to the web-based configuration screen. Note that you will find all of the configuration files in the /etc/privoxy directory and you can edit these text files "by hand" if you prefer not to use the web-based interface.
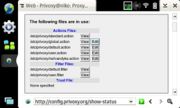
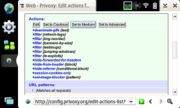
By clicking on the "Edit" buttons, you can fine tune each of the configuration files. The most important file in this list is the global.action file. Click on the "Edit" button next to /etc/privoxy/global.action to change the protection level to one of three pre-defined levels. (Note to desktop privoxy users: you may be used to setting the protection level in the default.action file. For the maemo version, this was changed to allow for easy updates to the default.action file.)
For the maemo version, the default protection level is set to "Medium". If you find this to be too aggressive you can set it to "Cautious" which will block fewer advertisements and give lower privacy protection.
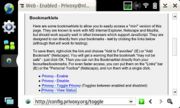
Once you have privoxy configured to your liking, you may find there are times that you need to temporarily disable privoxy to access a particular website. Fortunately, privoxy provides several bookmarklets for showing the current status and for quickly enabling/disabling privoxy filtering. Go back to the main privoxy page (http://p.p) and click on the link labeled "Toggle Privoxy on or off". On the new page, scroll about half way down until you see the following.
Click and hold on the link labeled "Privoxy – View Status". In the new popup box, select "Add link to Bookmarks...". This will allow you to see the current status of privoxy and quickly enable/disable it. When you select this new bookmark, a new web browser window will open that looks like the following.
Even though you disable privoxy via the web interface, the actual daemon process is still running in the background. Privoxy is simply allowing all content to pass through unfiltered. If you want to completely disable privoxy, you must do so through a Terminal as root.
/etc/init.d/privoxy stop
Note that if you stop privoxy in this manner, you must reconfigure your network connection to no longer use a Proxy (via the "Advanced" button). Due to a bug, unchecking the "Use proxy" button may not be enough for certain built-in applications such as the Application Manager.
[edit] Troubleshooting
Since you must configure privoxy on a connection-by-connection basis, all applications that use the http/https protocol will be filtered by privoxy. For the most part, this is not a problem. However, there are certain situations where you do not want privoxy to touch the http stream at all. Here are several occasions where this is true.
- If you use the built-in Media Player to play streaming internet radio, you may find that your stations do not work with privoxy configured on your connection.
- If your wireless access point redirects initial traffic to a login page on a non-standard port, you may find that you cannot get a connection.
- The Wayfinder Map application cannot download maps via a connection with Privoxy.
Fortunately, there is a way to configure your network connection to deal with these situations. Go to the Connectivity Control Panel and configure the connection as you did before. Get to the "Advanced" settings page where you entered the HTTP/HTTPS proxy information. On that same screen near the bottom there is a field labeled "Do not use proxy for:". In this field you can enter particular sites that should not be filtered by privoxy. For example, if you like listening to the internet radio provided by Soma FM, you would enter the following.
Do not use proxy for: *.somafm.com,*.stream.aol.com
Notice that you can use wildcards to match all prefixes like www.
Another possibility is to create two connection profiles for a particular connection. For the first "default" profile, you would configure privoxy as shown above. For the second profile (with a different name, perhaps something like "HOME-noproxy"), you would not configure privoxy. While not ideal, changing between the two connection profiles is quicker than editing the "Advanced" proxy settings for the connection every time you need to completely enable/disable privoxy.
If you decided to completely remove privoxy from your tablet, you will need to reconfigure your connections to no longer use a proxy. Due do a bug, unchecking the "Use proxy" checkbox it not sufficient. You must completely blank out the HTTP/HTTPS proxy fields and set the port numbers to 0. Then you can uncheck the "Use proxy" checkbox.
[edit] Changes To The Maemo Version
Since the tablet is a different user environment than a desktop workstation, several compilation/configuration changes were made to the maemo version of privoxy.
- Privoxy runs as "user" rather than "privoxy" to obviate the creation of another user on the NIT.
- Privoxy has been configured to allow editing of configuration files and toggling of running state via the web interface. On a multiuser system, this may cause problems, but it is assumed that there is only one user on the tablet.
- All privoxy configuration files in
/etc/privoxyare owned by user so that you do not need to be root to modify the configuration. - Setting the protection level is done in the
global.actionfile. This is to allow easy future upgrades to thedefault.actionfile. - The default protection level has been set to "Medium" rather than "Cautious".
- An additional action file from Neil Van Dyke provides additional online privacy. This file is regularly maintained so you are free to download the latest version to replace the current one in
/etc/privoxy. - No documentation is provided on the tablet to minimize installation size. All documentation is available online.
-
libpcre3(the Perl 5 compatible regular expression library) is statically compiled into privoxy to obviate installation of the library fromextras-devel. - Logging has been disabled.
[edit] Compiling Privoxy
If you don't like the way privoxy is compiled/bundled, you can get the source code and build it yourself. You will need a desktop machine with Scratchbox installed, as well as development tools specific to your tablet's OS. Instructions for setting up a development environment are available for gregale, bora, chinook, and diablo.
Once you have a working scratchbox development environment, you can download the maemo source for privoxy and untar it to your scratchbox home directory. Then it is simply a matter of changing to the newly extracted privoxy directory and building the code.
dpkg-buildpackage -rfakeroot -b
This will build a new binary package (in the directory above the current one). If you want to do any customizations for the build, you will need to go into the debian directory and change the files you find there.
[edit] USB connectivity
You can use Privoxy in case you don't have the NAT module (Network Address Translation) and you want to share the 770's internet connection on your desktop connected to it over USB. Simply change the IP address Privoxy binds to to 192.168.2.15.
- This page was last modified on 25 February 2011, at 09:49.
- This page has been accessed 20,285 times.

