MADDE/QtCreator integration for windows
(→Windows configuration) |
(→Deploy the key from QtCreator) |
||
| (4 intermediate revisions not shown) | |||
| Line 100: | Line 100: | ||
| - | 2 | + | 2. If Module in use is not "g_ether" choose "Load g_ether". Then click "Close". |
| - | + | ||
| - | + | ||
| - | + | ||
| - | + | ||
| - | + | ||
| - | + | ||
| - | + | ||
:[[Image:03_client_ether.png|300px]] | :[[Image:03_client_ether.png|300px]] | ||
| Line 114: | Line 107: | ||
| - | + | 3. Now you can set up the USB settings. Please click on "Edit", which shows you the USB-configuration settings. Then click on "Configure". After that your client is set up for the connection with your PC. | |
:[[Image:04_a_client_edit.png|300px]] [[Image:04_b_client_ready.png|300px]] | :[[Image:04_a_client_edit.png|300px]] [[Image:04_b_client_ready.png|300px]] | ||
| Line 121: | Line 114: | ||
| - | '''TIP:''' There might be problems if you have a GPRS connection running on the device. Please shut that down while testing | + | '''TIP:''' There might be problems if you have a GPRS connection running on the device. Please shut that down while testing. |
| - | + | ||
| - | + | ||
| - | + | ||
| - | + | ||
=== Windows configuration === | === Windows configuration === | ||
| Line 165: | Line 154: | ||
Add the password and all the data you see in the screenshot below. Check the box, that you want to use the password as the authentication method. After that click on "test" and see if the connection can be set up. | Add the password and all the data you see in the screenshot below. Check the box, that you want to use the password as the authentication method. After that click on "test" and see if the connection can be set up. | ||
| + | |||
| + | *Note: It seems that with the newer QT Creator (1.3.84), the location of the settings in the image below have moved to Tools->Options->Projects->Maemo Device Configurations | ||
[[Image:05_creator_add_device.jpg|300px]] | [[Image:05_creator_add_device.jpg|300px]] | ||
| Line 184: | Line 175: | ||
# In the Private Key file entry at the same window, browse for the 2nd file generated at step 3. "id_rsa" | # In the Private Key file entry at the same window, browse for the 2nd file generated at step 3. "id_rsa" | ||
# Click "Test" in Qt to check it works properly | # Click "Test" in Qt to check it works properly | ||
| - | + | [[Image:Example.jpg]] | |
| - | + | ||
=== Deploy SSH key === | === Deploy SSH key === | ||
| Line 211: | Line 201: | ||
You can configure these settings in the Maemo Device Configurations | You can configure these settings in the Maemo Device Configurations | ||
| - | Tools -> Options | + | Tools -> Options -> Projects -> Maemo Device Configurations |
| + | |||
| + | '''Note: ''' In older versions of Qt Creator the Maemo Device Configuration is under Qt4 tab. | ||
'''Note: ''' For these steps your device has to be connected to the PC and the password has to be valid. By clicking "Test" button, you can check if that is the case. | '''Note: ''' For these steps your device has to be connected to the PC and the password has to be valid. By clicking "Test" button, you can check if that is the case. | ||
| - | Now you click on "Deploy..." and select the public key you have created before. If you have specified a file | + | Now you click on "Deploy..." and select the public key you have created before. If you have specified a file name you will find it in: |
C:\MADDE\<version>\home\<username>\<keyname>.pub | C:\MADDE\<version>\home\<username>\<keyname>.pub | ||
| Line 223: | Line 215: | ||
[[Image:09_qtcreator_deploy_key.jpg|400px]] | [[Image:09_qtcreator_deploy_key.jpg|400px]] | ||
| - | Once the key is deployed correctly you can set up your device | + | Once the key is deployed correctly you can set up your device configuration to use the key to connect to the device. Change now the "Authentication type" from "Password" to "Key". Now it uses a standard location, for the private key, which should not exist. Change the location, with the one of your real key. Following this tutorial you will find it in: |
C:\MADDE\<version>\home\<username>\<keyname> | C:\MADDE\<version>\home\<username>\<keyname> | ||
| Line 233: | Line 225: | ||
== Use Maemo5 build settings == | == Use Maemo5 build settings == | ||
| - | Now all the configuration is done and you can select Maemo as a build configuration. If you have a project, which you want to compile for Maemo, then click on the project button in the menu of the left side. Now you should | + | Now all the configuration is done and you can select Maemo as a build configuration. If you have a project, which you want to compile for Maemo, then click on the project button in the menu of the left side. Now you should see a screen, like in the screen shot below. If you have the Qt libraries installed, then you will have the "Desktop" as the default option selected. |
[[Image:04_qtcreator_init.jpg]] | [[Image:04_qtcreator_init.jpg]] | ||
| Line 266: | Line 258: | ||
| - | + | Select the build configuration you want to use (located in the bottom left corner): | |
[[Image:08_qtcreator_final.jpg]] | [[Image:08_qtcreator_final.jpg]] | ||
| - | + | By clicking the run button, your application will be automatically compiled for the Maemo device, deployed, and started. | |
[[Category:Development]] | [[Category:Development]] | ||
Latest revision as of 01:44, 20 July 2010
| MADDE is currently a technology preview. These instructions are liable to change as development progresses. If some of the components do not work as expected, please add your question to the MADDE talk thread and follow up the discussion. tablets-dev.nokia.com is down, see MADDE#Installation for alternatives. |
Contents |
[edit] QtCreator and MADDE on Windows
This is a guide on how to enable MADDE in QtCreator. This is part of the technology preview. After following this guidance you are able to build your sources within QtCreator for your device, and deploy, run and debug your applications with few mouse clicks from your Windows installation.
Requires:
- MADDE installed on your Windows machine
[edit] Install latest QtCreator on your PC
You cannot use the latest official QtCreator for this. The version has to be >= 1.3.80! For these instructions the version of the 2010-02-24 is used! Find the latest build of QtCreator for windows here:
http://qt.nokia.com/developer/qt-snapshots
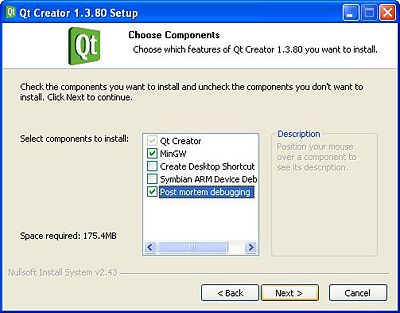
Please install besides the basic installation at least the components called "MinGW" and "Post mortem debugging" of QtCreator to be able to follow all the steps of the instructions. You should be able to select those, during the installation process in a dialog like this:
[edit] Add Qt for Maemo5
You can change the configuration of the Qt-version in your QtCreator installation by clicking:
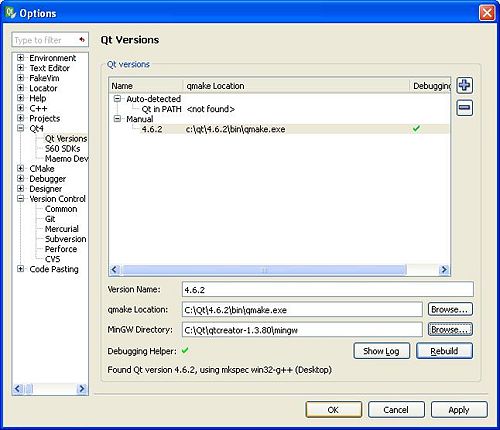
Tools -> Options... -> Qt4 -> Qt Versions
The screen you see then should look like the screenshot below. By default the Qt-versions are shown, which are installed on your system.
Tip: If you do not see any Qt version by default here, you most likely haven't installed the needed Qt libraries to compile your Qt application for your Windows environment.
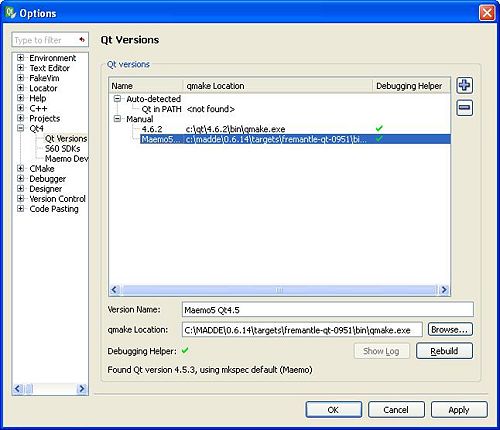
In the next step you have to add the Qt version for Maemo5 to the configuration of QtCreator. It is needed to compile your sources for your Maemo device. Click on the "+" in the upper-right corner. The configuration form will ask you to enter a "Version name" and to locate "qmake". You can find it in your MADDE installation folder under:
<MADDE_folder>/targets/<target_name>/bin
For the standard installation it would be for example:
Version name: Maemo Qt4.5
qmake Location: c:\madde\0.6.14\targets\fremantle-qt-0951\bin\qmake.exe
Now you will see Qt for Maemo as a new Qt Version in Qt Creator. But first you will see the red cross next to the Qt Version in the column "Debugging Helper". The last step you have to do now is clicking on "Rebuild" and after a while (you can follow the status in the QtCreator main window) it should look like this:
[edit] Configure device run-time in Qt Creator
After setting up the connection between your Windows PC and your device, you will be able to compile, deploy, test and debug your application with a single mouse-click. The description is divided into two parts and shows:
- what to install on device, and
- how to set-up your windows environment
[edit] Device configuration
[edit] Install the client
1. Open the Application Manager.
2. Enable the extras repository.
3. Go to: Download -> Development -> mad-developer
4. Install the client
The following instructions show how to connect your device with your PC by using the USB connection.
[edit] Configure the client for USB
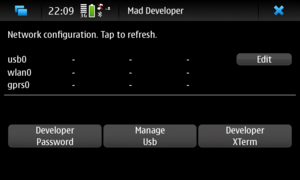
Please start the client on your device. As you want to use Windows as your development environment, you have to change the driver, which is loaded to instantiate the connection. You have to follow these steps:
1. After starting the client click on "Manage Usb"
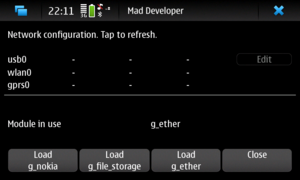
2. If Module in use is not "g_ether" choose "Load g_ether". Then click "Close".
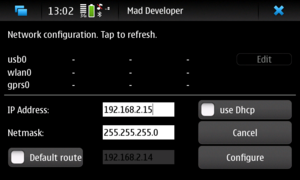
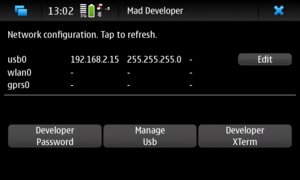
3. Now you can set up the USB settings. Please click on "Edit", which shows you the USB-configuration settings. Then click on "Configure". After that your client is set up for the connection with your PC.
TIP: There might be problems if you have a GPRS connection running on the device. Please shut that down while testing.
[edit] Windows configuration
The easiest way to connect your device to the PC is to install PC-Connectivity. The install-file you find here:
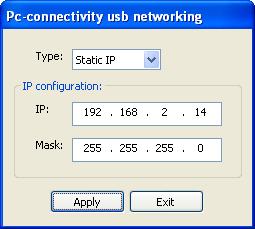
Then follow the instruction and choose just the option USB-Networking, like in this screenshot:
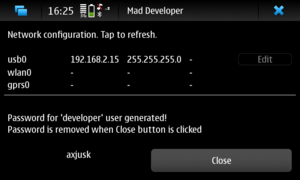
Connect your device with the PC. The client should be configured as described before. Choose "PC suite mode" as connection method. If not already automatically happened, enter these configuration details:
After clicking on "apply", in your network configuration you should see that the connection is established.
Tip: In some cases problems might occur, if you have an active VPN connection.
Important: If you have User Account Control enabled on Windows Vista/7, you MUST run this tool with the "Run as Administrator" option.
[edit] QtCreator Configuration
After the connection between your PC and the device is set up, you can configure QtCreator to deploy and run the built applications on device. You can add your device in the configuration. You will find it in:
Tools -> Options... -> Qt4 -> Maemo Device Configurations
First get the password from the Mad Developer application. You get it by clicking on "Developer Password" in the main view. Be aware that each time you click on the button, a new password will be created and that the password is only valid for the time it is shown in the application.
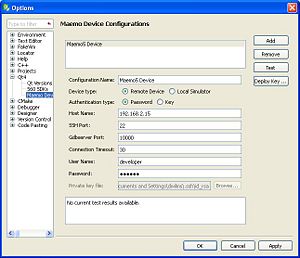
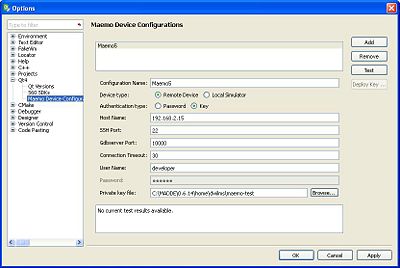
Add the password and all the data you see in the screenshot below. Check the box, that you want to use the password as the authentication method. After that click on "test" and see if the connection can be set up.
- Note: It seems that with the newer QT Creator (1.3.84), the location of the settings in the image below have moved to Tools->Options->Projects->Maemo Device Configurations
Tip You can use your ssh key for the connection. Click on "Deploy Key ..." and select your key. If the other settings are correct the key will be automatically deployed on your device, so that you don't have to worry about the passwords anymore. To Deploy the SSH key, you first need to obtain it. Here are the steps :
- Open up MADDE terminal in Windows. (In Start > Programs > MADDE > MADDE terminal)
- type "cd /"
- Type "ssh-keygen -t rsa"
- Pick a name for your key (I just called mine rsa1)
- Pick a password if you want one (I left it blank so no password)
- In Qt click "deploy key" and browse to where the key is (MADDE\MADDE_VERSION\home\<username>\.ssh)
- Select your_key_name.pub file
- Qt should say key sucessfully deployed
- Change "Authentication Type" option in Qt to "key"
- In the Private Key file entry at the same window, browse for the 2nd file generated at step 3. "id_rsa"
- Click "Test" in Qt to check it works properly
[edit] Deploy SSH key
If you have already created a key for other purposes you don't have to create a new one and you can ignore the description on how to create the key and just continue with the deployment of the key.
[edit] Create a key
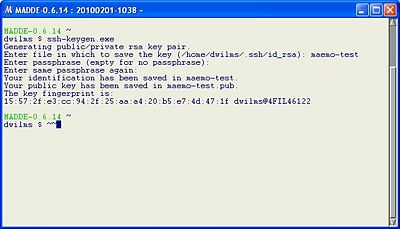
To create a key please open the "MADDE Terminal" and run:
ssh-keygen.exe
Then please follow the instructions. In this example the name of the key is set to "maemo-test". The terminal should look like this:
[edit] Deploy the key from QtCreator
To be able to connect to your device by using the key, you have to:
- deploy your public key on your device, and
- specify in QtCreator, where to find the private key
You can configure these settings in the Maemo Device Configurations
Tools -> Options -> Projects -> Maemo Device Configurations
Note: In older versions of Qt Creator the Maemo Device Configuration is under Qt4 tab.
Note: For these steps your device has to be connected to the PC and the password has to be valid. By clicking "Test" button, you can check if that is the case.
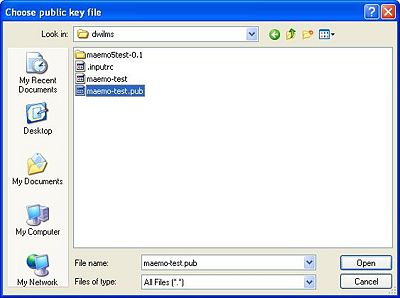
Now you click on "Deploy..." and select the public key you have created before. If you have specified a file name you will find it in:
C:\MADDE\<version>\home\<username>\<keyname>.pub
Once the key is deployed correctly you can set up your device configuration to use the key to connect to the device. Change now the "Authentication type" from "Password" to "Key". Now it uses a standard location, for the private key, which should not exist. Change the location, with the one of your real key. Following this tutorial you will find it in:
C:\MADDE\<version>\home\<username>\<keyname>
Now click on "Apply" and your QtCreator installation is set up to connect to the device via SSH key.
[edit] Use Maemo5 build settings
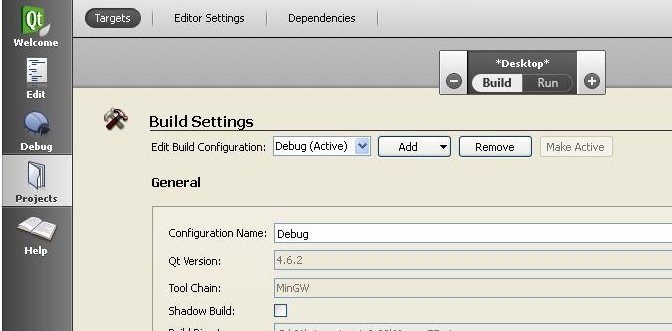
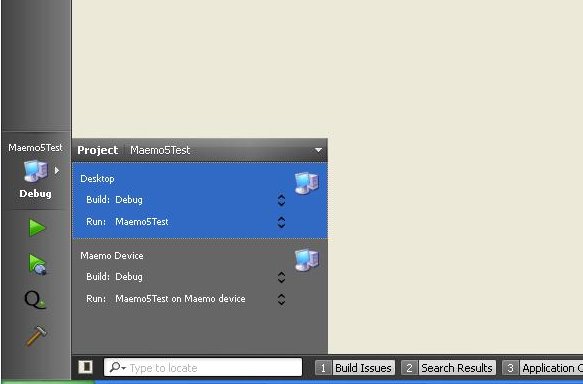
Now all the configuration is done and you can select Maemo as a build configuration. If you have a project, which you want to compile for Maemo, then click on the project button in the menu of the left side. Now you should see a screen, like in the screen shot below. If you have the Qt libraries installed, then you will have the "Desktop" as the default option selected.
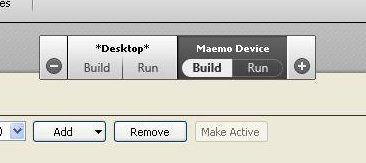
Now press the plus in the widget, which shows, that "Desktop" is selected as default. This should open a new dialog, where you select "Maemo Device":
After that you will find a new build-configuration.
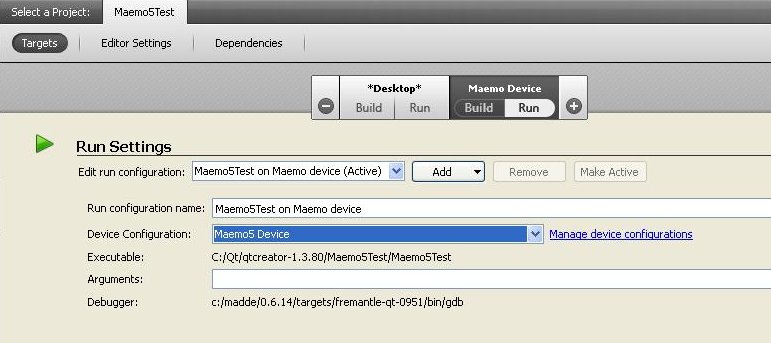
Now click there on "Run" and select your device, which you have configured before. In the example it was called Maemo5 Device.
Select the build configuration you want to use (located in the bottom left corner):
By clicking the run button, your application will be automatically compiled for the Maemo device, deployed, and started.
- This page was last modified on 20 July 2010, at 01:44.
- This page has been accessed 60,701 times.

